Form QR code setup
A Form QR Code lets businesses collect information from customers and visitors through a mobile-friendly form. Visitors can scan the code to submit contact information, customer inquiries, feedback, surveys, registrations, lead details, or event sign-ups directly from their smartphones.
Permanent QR Codes Advantage:
- $49 One-Time Payment: Pay once with no monthly or annual subscription fees.
- Editable Form Information: Update form content, fields, settings, or destination information without reprinting the QR code.
- Unlimited Scans: No scan quotas, throttling, or expiration.
Before You Start
Before creating your Form QR code, ensure you have gathered:
- Form title: A clear, descriptive headline explaining what respondents are submitting.
- Form description: Concise instructions or expectations for visitors completing the form.
- Required and optional fields: A defined list of questions and data points you need to collect.
- Submit button text: Custom call-to-action text (e.g., "Submit", "Send Message", "Register Now").
- Thank-you message: A polite confirmation displayed immediately after submission.
- Optional redirect URL: A target website destination where respondents are sent after submitting.
- Theme/design preferences: Brand colors and styling that match your visual identity.
- Smartphone for testing: A physical mobile device to scan and verify the form experience.
- Permanent QR Codes account: Sign in to your Permanent QR Codes account to create and manage your editable QR code.
Form Planning & Field Selection
Identify the essential information required from respondents. Minimizing unnecessary form fields increases completion rates significantly on mobile devices.
Post-Submission Experience
Determine what respondents experience after submitting their answers. You can provide an on-page confirmation message or automatically redirect them to an external landing page.
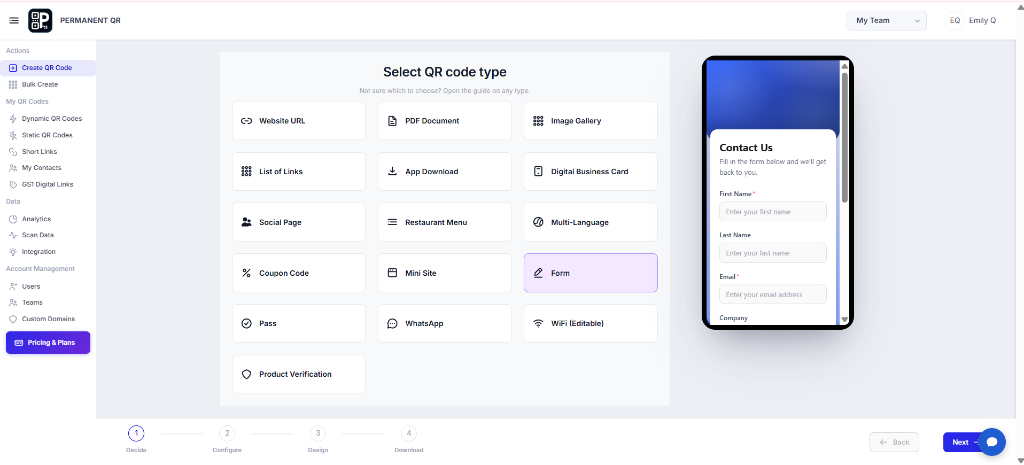
Step 1: Select Form QR Code
Log in to your Permanent QR Codes dashboard, go to the QR code creation section, and select Form from the available QR code types.
Step 2: Configure Your Form
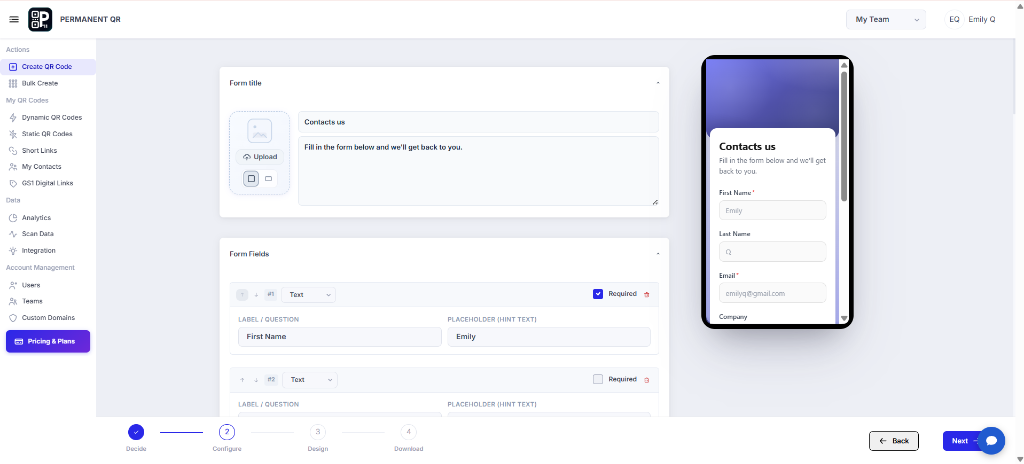
Enter your form title and description, then configure your basic header settings:
- Form Title: Add a clear title (such as "Customer Inquiry" or "Event Registration") displayed at the top of the form.
- Description: Provide brief instructions or context for visitors filling out the form.
- Header / Logo: Optionally upload a header image or logo to personalize your form.
Step 3: Add and Customize Form Fields
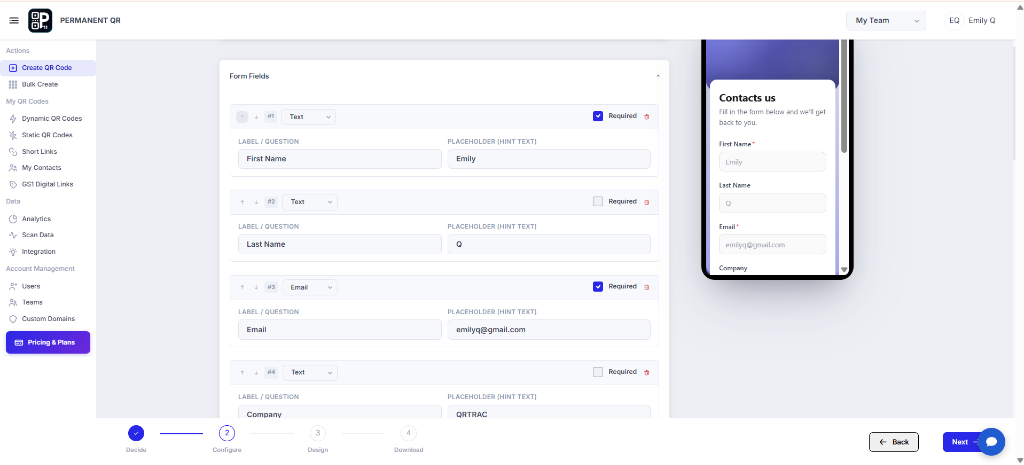
Add the fields you need to collect from respondents. Choose from standard or custom fields:
- First Name
- Last Name
- Company
- Contact Number
- Message
- Custom Text
- Custom Fields
- Field Labels & Placeholders: Enter clear question labels and optional placeholder text to guide users.
- Required Fields: Mark essential fields as required to ensure you collect necessary contact details.
- Reorder or Remove: Drag fields into a logical order and remove any unnecessary questions.
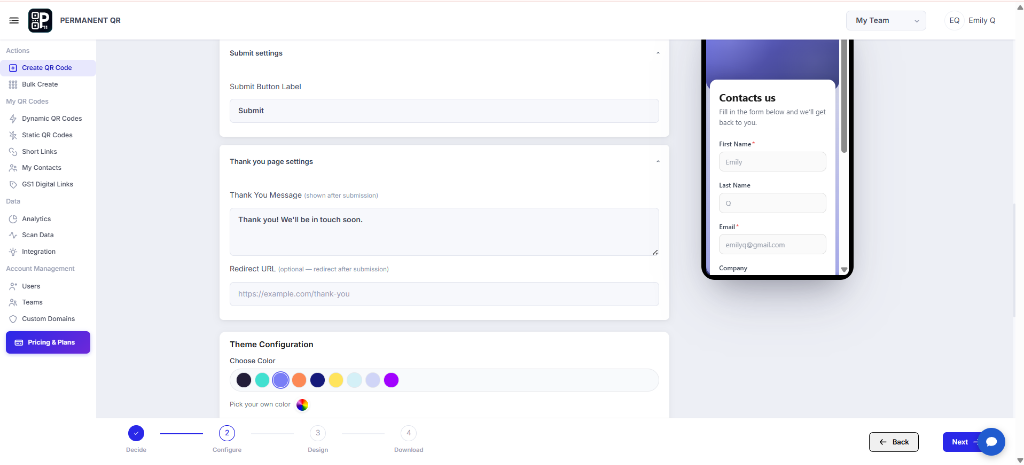
Step 4: Configure Submit and Thank-You Settings
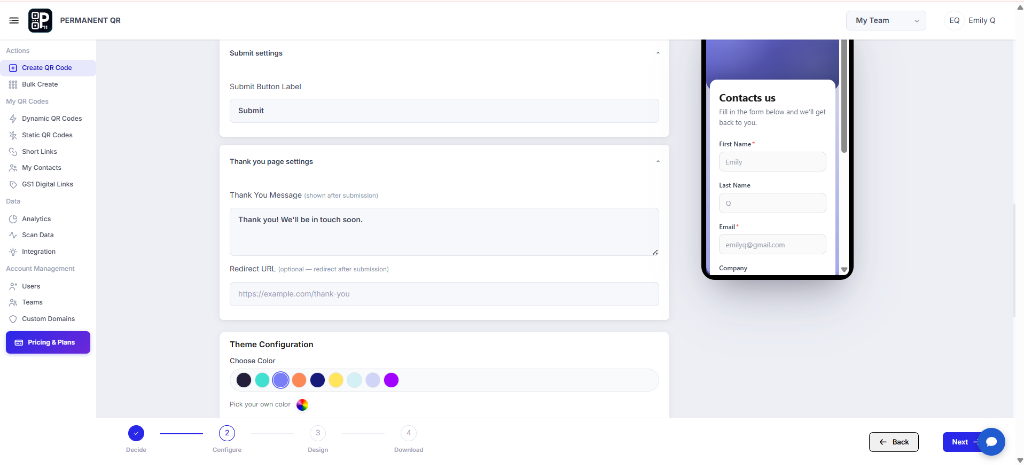
Configure what happens after a visitor submits the form:
- Submit Button Text: Enter custom button text (such as "Submit", "Send Message", or "Register Now").
- Thank-You Message: Add a clear confirmation message displayed immediately upon submission.
- Redirect URL (Optional): Enter a destination web address if you want users redirected to an external page after submitting.
Step 5: Customize the Form Theme
Choose your theme and adjust the form appearance to match your brand:
- Theme Colors: Select a preset color palette or enter your brand HEX color.
- Form Styling: Adjust button styling, field borders, and background contrast for readability.
- Preview: Check the live preview to verify the layout looks clean on mobile and desktop screens.
Step 6: Review Your Form QR Code
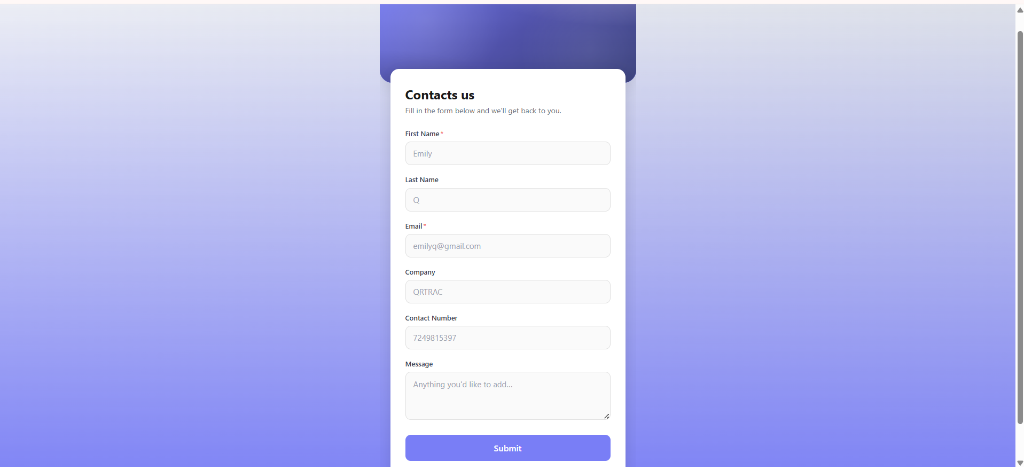
Review your completed form on the mobile preview to confirm all questions, fields, and styling appear correctly:
- Verify Field Order & Labels: Ensure question labels, placeholder hints, and required settings are accurate.
- Inspect Visual Theme: Check header styling, brand colors, and button contrast for mobile readability.
- Test Form Flow: Test the submission flow to ensure respondents experience a seamless submission journey.
Step 7: Download and Share Your QR Code
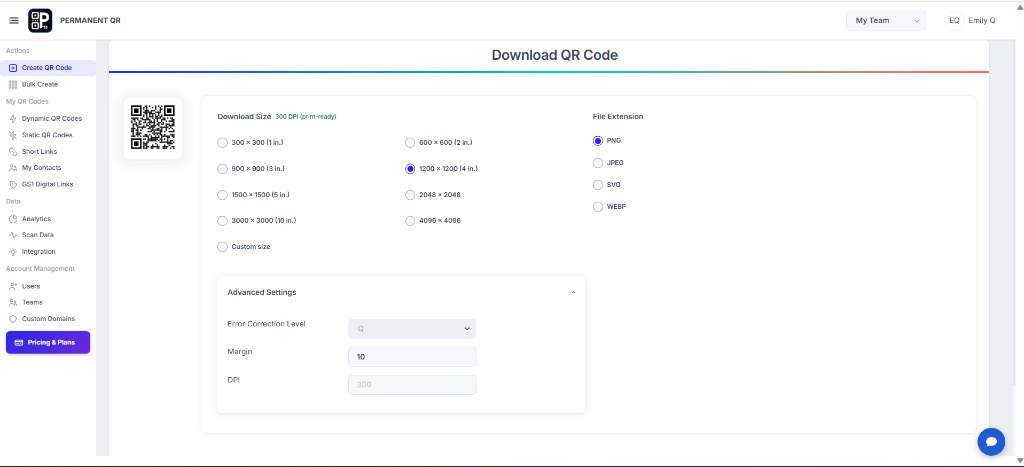
Download your finalized QR code in your preferred format and resolution, then distribute it across your marketing channels:
- Select Download Size: Choose print-ready resolutions (such as 300 DPI, 1200 × 1200 px) or enter a custom size.
- Choose File Extension: Export in PNG or WEBP for screens, or vector SVG for high-quality printing.
- Adjust Advanced Settings: Customize error correction levels and margin spacing if needed for your print placement.
- Share & Distribute: Deploy your QR code across flyers, brochures, posters, or digital channels.
What Happens After Someone Scans?
When a customer or visitor scans your Form QR Code, they experience a streamlined, mobile-optimized submission journey:
Scan Code
Visitor points their smartphone camera at your printed or digital QR code.
Landing Page
A responsive mobile form opens instantly with your title, description, and custom theme.
Complete Form
The visitor fills in required and optional fields using smartphone-optimized input keyboards.
Submit Information
The visitor taps Submit; entries are verified and securely processed in real time.
Thank-You / Redirect
A confirmation message appears on screen or the user redirects to your designated URL.
Test Your Form QR Code
Ensure zero-friction submissions for your visitors by verifying these 13 testing checkpoints:
Test QR scan: Scan with built-in camera apps to ensure instant recognition without scanning lag.
Verify form loads: Ensure the digital form opens promptly over both cellular and Wi-Fi connections.
Check title and description: Confirm headline and instructions display clearly without text truncation.
Test required fields: Verify that leaving required fields empty triggers clear validation alerts.
Test optional fields: Confirm respondents can submit successfully when optional questions are skipped.
Test email/contact validation: Check that invalid email addresses or incomplete phone numbers are caught properly.
Test submit button: Verify the button changes state during submission and processes without errors.
Verify thank-you message: Confirm the thank-you confirmation text appears clearly once submitted.
Verify redirect URL if configured: Ensure automatic redirects navigate to the exact intended webpage.
Test on iOS: Verify form input fields, keyboards, and buttons render cleanly in Mobile Safari.
Test on Android: Confirm seamless input operation in Google Chrome on various Android screen sizes.
Check mobile responsiveness: Ensure inputs, margins, and buttons scale properly without horizontal overflow.
Check QR contrast and scan reliability: Verify scanning holds under bright overhead lights, angled perspectives, and varied distances.
Common Problems
1. QR code does not scan
Cause: Insufficient contrast between foreground pattern and background, quiet zone borders removed, or the code is printed too small for smartphone camera focus.
Fix: Use high-contrast dark pattern dots on a light background, preserve quiet zone margins, and print at minimum 1 × 1 inch (25 × 25 mm) for handheld reading.
2. Form page does not open
Cause: Scanning device has restricted or offline internet access, or destination link was entered with a typographical error.
Fix: Confirm active cellular or Wi-Fi connectivity and verify destination URL formatting in your Permanent QR Codes dashboard.
3. Form fields do not display correctly
Cause: Incomplete field configuration, unsupported special characters in labels, or conflicting theme styling.
Fix: Review field labels and hint text in your dashboard settings, preview the live layout on mobile, and save changes to update instantly.
4. Submission does not work
Cause: Required fields were skipped, email address format was invalid, or device encountered a momentary connection timeout.
Fix: Fill in all required fields marked with asterisks, check email syntax, and test submitting across multiple mobile browsers.
5. Redirect or thank-you page does not work
Cause: The redirect URL omitted the mandatory https:// protocol prefix or points to a private/unpublished page.
Fix: Open the redirect URL in an incognito browser tab to confirm it is live and publicly accessible, then update the complete URL in your submit settings.
Common Mistakes to Avoid
❌ Adding Too Many Fields
Asking for excessive or redundant details causes respondent fatigue and drastically lowers form completion rates on mobile devices.
❌ Making Every Field Required
Forcing visitors to input non-critical data points leads to form abandonment; reserve required flags only for essential information.
❌ Using Unclear Field Labels
Using obscure internal jargon or ambiguous questions confuses respondents about what data they should enter.
❌ Skipping Mobile Testing
Assuming desktop simulator testing guarantees a smooth experience on real iOS and Android smartphone touchscreens.
❌ Using Poor QR Contrast
Using light pastel colors or low-contrast gradients on white print materials, causing camera scanners to fail.
❌ Printing Without Testing
Printing high-volume marketing batches before verifying live scan performance and complete end-to-end form submissions.
Common Uses
Customer Feedback
Place on dining tables, receipts, hotel rooms, and service counters to gather real-time customer satisfaction ratings.
Contact & Lead Collection
Place on trade show booths, networking badges, and sales brochures to capture qualified buyer inquiries and prospect details.
Event Registration
Add to conference flyers, invitations, posters, and ticket vouchers for frictionless attendee check-ins and sign-ups.
Surveys & Polls
Print on product boxes, mailers, and warranty sheets to collect consumer preferences, product reviews, and user insights.
Product Feedback
Print on product packaging or instruction booklets allowing customers to submit questions or feedback directly to support teams.
Appointment Requests
Place in store windows, salons, medical clinics, and reception desks for walk-in appointment and consultation requests.
Restaurant Feedback
Feature on table tents and dining menus to gather immediate dining reviews, food feedback, and server recognition.
Customer Support & Warranty
Position on warranty cards, appliances, and retail packaging for streamlined warranty registrations and service claims.
Frequently Asked Questions
What is a Form QR Code?
A Form QR Code opens a mobile-optimized digital form when scanned, allowing visitors to submit information such as contact details, feedback, inquiries, registrations, or survey responses using their smartphone.
What fields can I add to a Form QR Code?
You can add standard fields such as First Name, Last Name, Email, Company, Contact Number, multi-line Message boxes, and customizable text fields tailored to your collection needs.
Can I make form fields required or optional?
Yes. You can toggle each field as required or optional, giving you complete control over what information respondents must submit before completing the form.
Can I customize the Form QR Code?
Yes. You can customize the form theme colors, brand appearance, field labels, button text, thank-you messages, and customize the QR code pattern, eyes, and logo frame.
Can I change the form after printing the QR code?
Yes. Because Permanent QR Codes are editable, you can update questions, field labels, thank-you messages, or destination settings anytime from your dashboard without reprinting the physical QR code.
Can I add a thank-you message?
Yes. You can craft a customized confirmation message that displays immediately on screen once a respondent taps submit.
Can I redirect visitors after form submission?
Yes. You can optionally specify a destination redirect URL (such as your website homepage, catalog, or resource center) that automatically loads after submission.
Can I use a Form QR Code for lead collection?
Yes. Form QR Codes are widely used at trade shows, conferences, retail stores, and in print advertising to capture verified prospect details.
Can users submit the form from a smartphone?
Yes. The form is responsive and mobile-optimized, designed for quick touch interactions, smartphone keyboards, and instant loading on any mobile device.
Is there a scan limit for a Form QR Code?
No. Permanent QR Codes include unlimited scans, permanent validity, and no monthly scan caps or expiration dates.